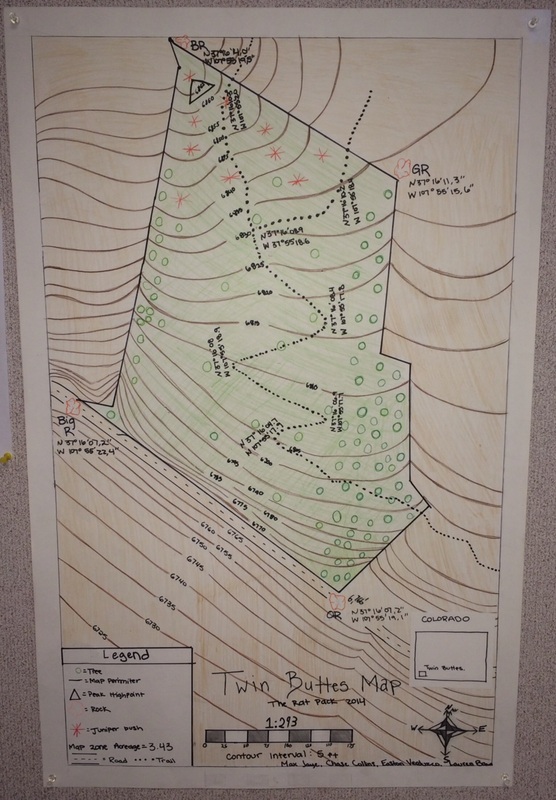
TOPOGRAPHIC MAP PROJECT
To measure our bearings and paces we used our GPS’s and compasses. To measure out
the paces we counted our steps from rock to rock. Bearings directly translated
on to our map to measure the angles from point to point and we converted
footsteps to 1 step equaling 2.5 mm. We used the elevation tool on Google Earth
to show us how to lay the contour lines. Contour lines are split by a certain
amount of elevation to show the steepness of areas on the map. Someone hiking or
biking in our mapped area could use the contour lines to determine where to go
and what is safe. Doing this map project opened our eyes to the space we were
mapping. It showed us the relationship and space between the rocks, bearings,
trees and showed us how different things look on a map compared to real
life.
RUBE CALCULATIONS
Calculation
1:Potential
Energy(Joules) Of The Falling Domino
Formula:PE=mgh
mass
of marble=0.02045kg
Acceleration of Gravity= 9.8 m/s
Height=0.33
m
PE=(0.02045kg)(9.8m/s2)(0.33m)=0.0668
J
Potential Energy=.0668 J
Calculation 2:
Velocity(m/s)
Of The Car
Formula:
V=d/t
Distance =0.088 m
Time=0.34 s
V=(0.088m)/(0.34s)= 0.258m/s
Velocity=0.258 m/s
Calculation 3:
Mechanical
Advantage: Spoon
Distance
ratio= 0.88m/0.72m
The
mechanical advantage is 1.22
Calculation 4:
Kinetic
Energy(Joules)Of Swinging Domino Starting Marble
Formula:
KE=½mv2
Mass
of domino= 0.0055 g
Velocity of domino= 0.73 m/s
KE=½(0.0055g)(0.73m/s)2=0.00146J
KE=0.00146J
Calculation 5:
Momentum(P)
Of The Second marble
Formula:
P=mv
Mass of marble:0.0061 kg
Velocity of marble=0.27 m/s
P=(0.0061kg)(0.27m/s)=0.0061kg*m/s
Momentum=0.0061kg*m/s
Calculation 6:
Work
(Joules) Of Car
Formula:W=Fd
Force=1.035
Distance=0.088
m
W=(1.035N)(0.088m)=0.091J
Work=0.091J
Calculation 7:
Power(Watts)
Of Second Marble
Formula:
Power= W/t
Work=0.09 J
Time=0.34
s
Power=(0.09J)/(0.34s)=0.26W
Power= 0.26W
Calculation 8:
Conservation of Momentum Of Second Marble To Third Marble
Formula:m1
V1=m2
V2
mass1=
0.0061 kg
Velocity1=
0.27 m/s
mass2=0.0061kg
Velocity2=(0.0061m1)*(0.27v1)/(0.0061m2)=0.27m/s
Velocity2=0.27m/s
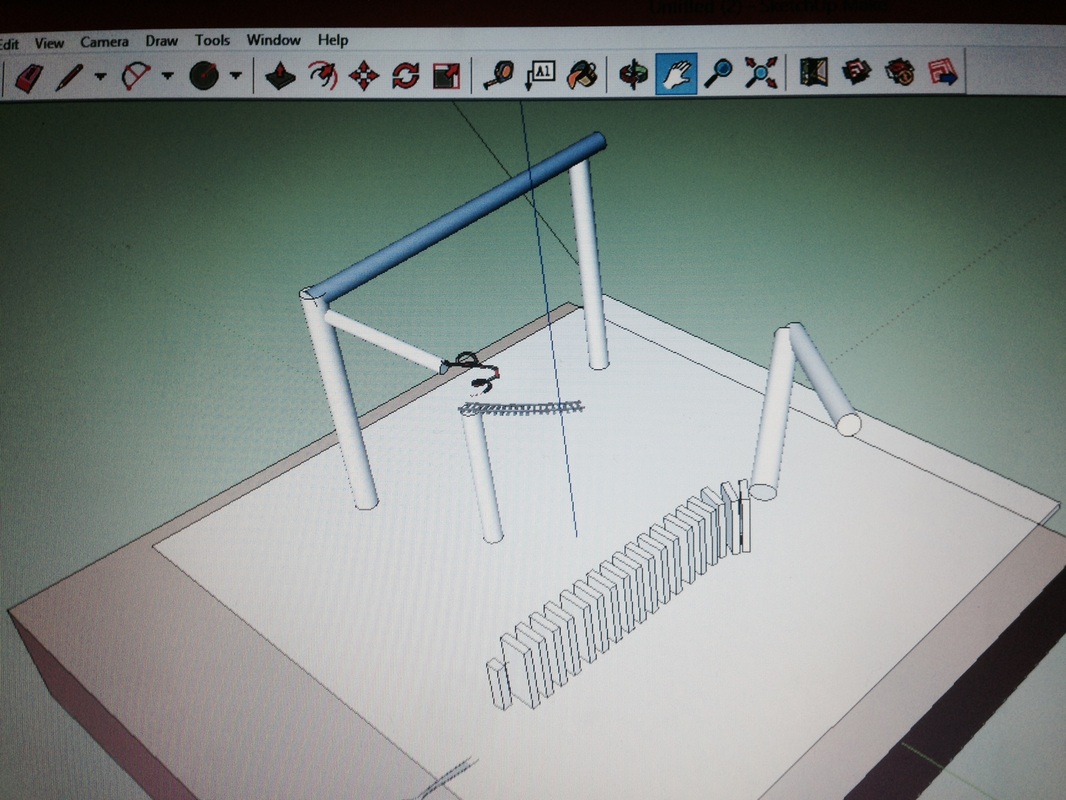
RUBE GOLDBERG PROJECT EXPLAINATION
For the Rube Goldberg project, we had a lot of regulations to meet. A Rube Goldberg
is a chain reaction of events used to accomplish a task. We had to have one
simple task, 15 steps, 3 simple tools, and our Rube had to run for at least 15
seconds. Our Rube also had to work 2 out of 3 times.
For the Rube Goldberg project, we had a lot of regulations to meet. A Rube Goldberg
is a chain reaction of events used to accomplish a task. We had to have one
simple task, 15 steps, 3 simple tools, and our Rube had to run for at least 15
seconds. Our Rube also had to work 2 out of 3 times.

Rocket Reflection:
The rocket exhibition went surprisingly well for me and my group. Our rocket not only went higher then we expected, but it also deployed the parachute. I liked the compatibility that me and my partner had. We built two rockets, and both of them were a joint effort. I really liked the structure of the whole project and just the idea of building rockets. If I could change something about the project, I would make our second rocket taller so it went higher. Some advice I would give to an incoming freshman would be not to focus as much on the parachute, but to focus on more of the aerodynamics of the rocket. I certainly regret thinking about the bare minimum and just finishing the parachute as soon as I could and then improvising from there. I would take more time only making one rocket rather then wasting time on two different ones.
Rocket Log:
Rocket Log:
Day 6, Entry
1
Today we finished making the pressure chamber and started the nose cone.
Day 7, Entry 2
Today we had a test launch. I was disappointed in how high our rocket went but we can make it better.
Day 8, Entry
3
Today we put fins on our rocket. I think they might break if it lands awkwardly but if we make a good parachute the we won't have to worry about it.
Day 11, Entry
4
Today we finished our parachute, I am excited to see how good it does.
Day 13, Entry
5
Today we had our second test launch. Our rocket only went about 50 feet. The
Day 15, Entry
6
Today we did some test launching
again, Max and I keep trying to blow up our rocket by making Dave put 90 psi
into our rocket, but since we don’t have the high pressure shims, the air just
keeps escaping from the rocket before it even
launches.
Day 18, Entry
7
Over the weekend, we built a second
rocket. The pressure chamber is only 1 2 liter bottle and the nose cone is only
half of another 2 liter bottle, the fins are made out of foam board too. But the
best part about it is the parachute, I spent about an hour making it and I’m
very happy with how it turned
out.
Day 19, Entry
8
Today we got to test launch our
rocket, we even gave it the longest name ever and we even made it an awesome 4
foot long banner. When we launched it, our parachute deployed a little early,
but still worked like a charm, I can’t wait until we can launch it at the
exhibition.
